
The old adage “out of sight, out of mind” can easily apply to RV roofs if we’re not careful. It’s also not terribly convenient to climb to the roof, so many of us try to put it off for as long as we can. However, roof maintenance is critical in keeping your motorhome in drivable condition. What kind of care does the roof need?
Here is a list of RV roof maintenance tasks:
- Cleaning
- Inspection
- Repairs (sealing, caulking, etc.)
You won’t want to miss this informative guide if you’ve never climbed your RV roof before and given it a good once-over. I’ll tell you exactly how to clean your roof depending on the material and how to patch it up.
Cleaning Your RV Roof – Get It Squeaky Clean
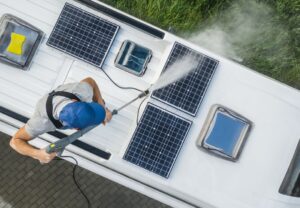
Your motorhome’s roof is exposed to the most weather and debris. Even if it doesn’t look that dirty from your vantage point on the ground, you’ll never know until you climb up there and check it out.
I always recommend having a spotter when accessing your motorhome’s roof. You will be up 10 to 15 feet up on a smooth, sometimes rounded surface. If you take a tumble or trip, you could end up seriously hurt. You don’t want to do it alone.
Take your time as you climb up the roof. Have your spotter hand you supplies one at a time. You’ll need a wide broom, a cleaning product, and a bucket.
First, give the roof a pass-through with the wide broom. This will sweep away all the surface debris, such as dirt, twigs, and leaves. You can use a roof cleaner to remove sap, caked-on messes, and stains.
What’s the best cleaner for your motorhome roof? That depends on the material. However, as a rule of thumb, avoid harsh products such as citric ingredients and petroleum distillates.
Does your motorhome have a rubber roof? You must be especially careful with the harsh ingredients, as they can chew through the rubber and destroy the structural integrity of your roof. Dicor rubber roof cleaner is a popular choice for RVers.
Spray & Forget roof cleaner works for other types of roofs, as it’s designed to clean tile, clay, slate, wood, and asphalt surfaces. The product is free of phosphates and bleach and can remove mildew, mold, algae, and other messes.
Roof cleaners usually require some dilution in water before you apply them, which is why I recommended bringing a bucket up to the roof. Have your spotter thread you a hose, fill the bucket with water, and dilute the cleaner according to the manufacturer’s instructions.
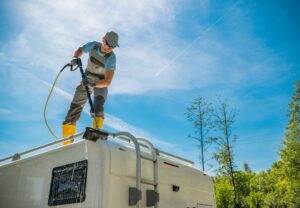
Pour some of the solution onto the roof and use your broom to push it around. Please wear well-treaded shoes on the roof, as you need a good grip. Even then, I would caution you to walk extremely carefully.
Your roof will become very slippery with the cleaning solution and water. If you take one wrong step, you could slip and fall, possibly off the roof.
Don’t get close to the edges of the roof either, especially when it’s wet. Again, you might slip, and your momentum could cause you to fall.
I recommend a wash mitt if you have to scour at hard-to-remove stains. You can also use a hard-bristled brush, but nothing more abrasive than that. Steel scrubbers will destroy most roof materials.
Work on one section of the roof at a time, allowing that section time to adequately dry before you tackle the next one. This will reduce your chances of a slip and fall, even if it’s time-consuming.
Inspecting the RV Roof – Looking for Damage
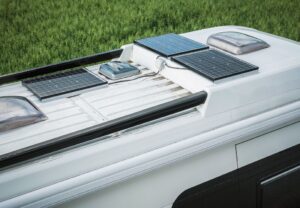
Now that your roof is clean, you can see any flaws more easily. Comb over every last square inch of the roof, looking for dents, caved-in areas, and other weak spots. Check all the seals and seams. Do any seem loose and gaping to you? Make a note of that, as you’ll have to fix it later.
Don’t forget the seals around the air conditioner, refrigerator vent, vent fan, and other appliances, and check the side seams too, as they often get overlooked.
You might have to pop off some vent caps to see the seals. Keep your eyes peeled for crevices, holes, and cracks.
RV Roof Types and How to Repair Them All
Have you noticed cracks, weak seals, and other openings that could put your roof at risk? You must fix them, but how you do that varies based on the RV roof material. Here’s an overview.
- Aluminum: A common motorhome roof material is aluminum sheeting, which can last about 20 years. Durable, lightweight, and waterproof when layered, aluminum is relatively puncture and pierce-resistant. However, adjoining sheets can separate, leading to leaks.
- Fiberglass: Single-piece or multi-piece fiberglass shells are molded for a perfect fit. Fiberglass is fire-resistant, rustproof, and crack-resistant. It’s also an excellent insulator. However, thermal changes can cause cracks, and repairing damaged fiberglass is pricy.
- Rubber TPO: Rubber thermoplastic polyolefin or TPO is one of two rubber materials used for RV roofs. It’s a single-ply material that’s inexpensive and relatively easy to install. However, it’s likelier to crack the longer it’s on your roof.
- Rubber EPDM: Your roof could also be made of rubber ethylene propylene diene monomer or EPDM. This low-cost, lightweight roof material is tear-resistant, but it can puncture. Its dark color also warms up fast, which can make your motorhome hot.
Now that you know your options, let’s discuss how to repair them.
Repairing an Aluminum RV Roof
An elastomeric sealant can pull aluminum sheets together and eliminate any gaps. The coat goes on like paint, so it’s not difficult to apply. Heng’s rubber roof coating is a popular product among RV owners.
You can purchase it in up to six gallons at once, which should be enough to cover large motorhome roofs. Your new coating will better resist weather, UV rays, and environmental elements than the original aluminum sheets did.
As an FYI, elastomeric sealant will usually dry white, so your roof won’t have a metallic sheen anymore. However, you shouldn’t mind that so much if your roof was painted to begin with.
Repairing a Fiberglass RV Roof
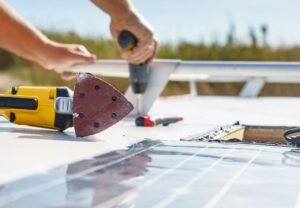
A small hole or crack in fiberglass does not mean you have to replace the whole shell. You can repair the issue using a product like Heng’s NuFlex sealant.
This roof sealant is designed for all sorts of joints, whether from air conditioning units or roof vents. You shouldn’t have to use a primer, as the sealant will stick to many substrates, fiberglass among them.
EternaBond RoofSeal tape is another product you can apply to fiberglass blemishes. This UV-stable tape comes in two-inch by 50-foot strips and is available in black, white, gray, or tan.
The tape has a backing made of hardy aluminum and a MicroSealant layer that’s airtight and waterproof. The tape works in frigid conditions of -70 degrees Fahrenheit.
Fiberglass roofs are also prone to oxidation. After cleaning your roof, I’d suggest using a wax or restorer to treat mild oxidation. Wrap up the job by going over the roof with an orbital buffer.
What if your fiberglass roof has more severe oxidation? Apply a more abrasive polish but nothing too harsh.
303 Aerospace Protectant can keep your fiberglass roof free of stains, color fading, and UV damage, so finish the roof with that.
Repairing a Rubber RV Roof
You can use the same repair methods for an EPDM and TPO roof, which is convenient. EternaBond RoofSeal tape is an appropriate solution for small cracks and dings on your rubber roof.
Clean and dry your roof before applying the tape, as that will help it stick its best. I also recommend running over the section of tape you applied with a roller to prevent bubbles. Those bubbles can let air in so the seal isn’t as strong.
Alternatively, Dicor DiSeal tape will get the job done. The compound is designed for all roof materials, including aluminum, fiberglass, TPO, and EPDM rubber. The weather-resistant tape takes up to 24 hours to cure but should last for at least a year.
You can also caulk any gaps or openings using a product like Dicor self-leveling lap sealant, which is especially handy for back and front cap seals and vents.
I like this product because you can apply it over existing seals, even over older layers of Dicor lap sealant that have worn away over time. However, if you can scrape away any old sealant residue before applying the new stuff, that will help cover the crack or opening better.
Make sure the sealant has adequate time to dry before you begin driving your RV, as you don’t want to shift anything and end up with a streak of sealant on your roof.
How Long Will My RV Roof Last? How Often Should I Clean It?
Your RV roof is cleaner and in better shape than since it shipped off the manufacturer’s lot. How often should you clean your roof going forward?
That depends on how often you use your vehicle. Frequent travelers might want to clean their roofs monthly, while less frequent RVers can get away with waiting three months.
However, even with regular cleaning and care, the time will inevitably come when you’ll have to consider a roof replacement. How long your roof lasts varies depending on the material you select, so let’s take a look.
- Aluminum RV roofs: 20 years, but you will begin to seek leaks within five to 10 years, so you’ll have to seal it at that point
- Fiberglass RV roofs: 20 to 50 years
- Rubber RV roofs: 25 to 30 years
Extending the Life of Your RV Roof
Replacing your RV roof is inevitable unless you have a molded fiberglass camper, but you can milk the max time out of it. Maintaining the roof is already a great start.
I also recommend parking your RV more cautiously, especially during the offseason. If your vehicle sits in direct sunlight for weeks or months, the UV rays will begin to oxidize and wear down the roof. Every roof material will succumb eventually.
Park your motorhome under a covered area, ideally an awning, roof, or overhang. Trees don’t effectively safeguard your vehicle from UV damage because they have openings to let the light in.
If you absolutely can’t cover your RV when not using it, invest in a cover. The cover should be waterproof, weatherproof, and UV-resistant.
Conclusion
RV roofs require just as much maintenance as the rest of the vehicle to keep you and your family and friends safe on your latest adventures. Start by cleaning the roof about once a month (more seldom if you don’t use your motorhome as often).
Check for small cracks and gaps, as they’ll only become bigger with time. Patch those up with sealant, caulk, or tape. Watch where you park your RV, limiting sun exposure as much as you can.
An RV cover comes in handy for offseason or driveway storage, but double-check that it’s UV-resistant.