
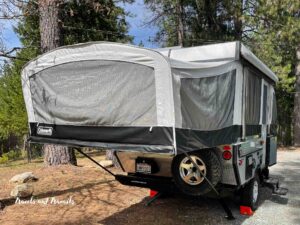
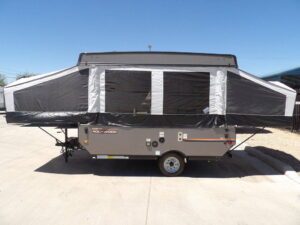
The pop-out canvas was one of the features that caught your eye when you originally bought your camper. Since then, you’ve enjoyed many memorable afternoons and evenings under its protection, but the canvas has become frayed and tattered. Is it difficult to repair?
It’s not difficult to fix torn or ripped pop-up camper canvas. You can use a repair kit to get the fabric operational. The most difficult part is accessing the damaged canvas, as you may need a ladder to reach the top of your camper.
Canvas doesn’t last forever, so you’ll have to fix the holes in yours, even if it’s in good condition right this moment. I’ll go step-by-step and explain how it’s done so you can patch up your camper today.
What Causes Holes and Tears in Pop-Up Camper Canvas?
Before we get into the canvas repair process, let’s delve into why your pop-up camper has fallen into disarray.
Inclement Weather
The soft walls of a pop-up are especially not designed for bouts of bad weather. A storm can carry debris like sticks or small stones, or the clouds can release pelting hail. This damage can leave your camper canvas worse for wear, with small rips and tears throughout.
Dirty Canvas
How often do you clean your camper? You must remove debris from its surface every time you pop it up or compress it down. If you don’t, that debris can get trapped and rub against the canvas when you tow your pop-up.
Sunlight
Sunlight is by far the most egregious cause of torn camper canvas. As the sun beats down on the pop-up, the material begins to weaken. Eventually, the fabric tears. You will also notice that the fabric has faded.
Ignoring Small Holes
Do not ignore small rips and holes in your camper fabric. The more you use the camper, the larger those holes will become. What would have been an easy and not-involved repair job now becomes more complex and time-consuming.
How to Fix Damaged Pop-Up Camper Canvas

Now that you better understand what may have caused your pop-up camper canvas to fall apart, you’ll want to do what you can to put it back together. Without further ado, let’s go over the required steps.
Step 1 – Remove the Awning from the Pop-up Camper
You can’t do much with your awning where it’s inaccessible. You’ll have to remove your awning if it’s detachable. If not, you’ll have to climb a ladder to access the awning and pop it up.
This step and the next assume your awning comes off. Your awning will be attached to the camper via four bolts. A cordless drill with a bolt extractor tip can loosen the bolts.
You’ll see two more screws on either side of the awning. These keep the fabric in the awning track, so you don’t need them attached right now. These screws are connected to a horizontal plate, so you’ll need your electric drill to loosen them. Alternatively, a screwdriver works fine.
Next, grab the awning arms from the brackets. The arms are loose enough that you can take them out and lay them down on the grass. I would recommend having a towel or a tarp ready so the awning doesn’t get dirtier.
Now you must remove the awning tube. Take a flat-blade screwdriver and insert it between the track where you see the awning fabric. Push down and the parts hold the fabric should open. You can unfurl the awning fabric.
Use a second person to lift the awning from the top of your pop-up camper and gently lay it down on the ground.
Step 2 – Take the Canvas Off the Awning
This next step also assumes your awning is removable from your vehicle. Check the roller tube springs. The rear spring should have a lock that you can secure by taking off the plastic cap.
Put a screwdriver in its place, keeping the screwdriver secure while you work. If you shift the roller tube and the screwdriver jostles, the spring can fly out and cause serious injury to yourself, others, or your camper.
Next, put vice grips on the bracket of the right awning leg, elevating them so you can adjust the lever to its rolled-up mode.
The end cap has pop rivets, which you can remove using a cordless drill or a hammer and punch. Now you can detach the roller tube’s spring assembly and free the canvas from the awning.
Step 3 – Measure the Hole in the Canvas
Now that you’ve gotten your pop-up camper canvas in front of you, it’s time to get down to business.
You can’t go about repairing the hole or tear until you measure it. And why is that, you ask?
The size of the hole or tear dictates your repair method. For example, you can glue together a small rip or hole.
However, if the hole exceeds several inches, you have no choice but to order replacement fabric and patch in a new spot, but we’ll get to that.
For now, just grab a ruler and measure the length and width of the hole. The smaller, the better.
Step 4 – Purchase an Awning Repair Kit/Products
Do you only have a small hole or several in your camping canvas? Good news, you have the most options for repairing it.
You can use a product like RV glue. Better Boat Store’s marine sealant is designed for campers, automobiles, and boats.
It comes in a 10-ounce container. This heavy-duty adhesive features an elastomeric formula so it’s malleable but never weak.
Resistant to saltwater and UV light, this marine sealant is also waterproof, which is what you need. Your pop-up camper canvas will get wet, whether it’s from precipitation or cleaning it. You don’t want the adhesive to get washed away.
You can also try something like Dulepax RV awning repair tape.
The TrailMax outdoor canvas patch kit is a great pick for larger holes in your pop-up camper fabric, but you can also use this for smaller holes if you want to get a jump on them.
Step 5 – Clean the Canvas
You can’t expect any bonding product to adhere well to a dirty awning. Likewise, even if you’re only patching up the canvas, you should still work with a clear surface.
You can clean the camper using soap and water. Fill a bucket with water, mix some mild dish soap into the bucket, and mix until you get suds. Dip a sponge in and wipe down one side of the canvas, then the other.
What if a good sudsing up didn’t clean all the stains from your camper? It happens, especially if you haven’t cleaned your vehicle in a while (or ever).
Fortunately, you can rely on an awning cleaner for these purposes. Star Brite RV awning cleaner is a popular pick among RVers and one of my favorites. You can buy it in a 32-ounce bottle, so it should be sure to last you for a while.
Star Brite’s RV awning cleaner can remove insect deposits, caked-on dirt, bird droppings, and leaf stains from vinyl and fabric. You won’t have to worry about this cleaner staining or discoloring your awning.
Once you’re done cleaning your camper, give the fabric adequate time to dry before you begin working.
Step 6 – Repair the Damage
Now it’s time to get to work.
Repairing Pop-Up Camper Canvas Holes with Tape
Using awning repair tape is the simplest option, so let’s begin with that.
Cut a piece of tape somewhat larger than the width and length of the hole or tear. Take the fabric on both sides of the tear and pinch the sides together.
You should push the fabric together so it’s like the hole isn’t there. Keep the sides pinched and adhere the tape over the fabric while it’s pinched. You might need a second set of hands for this job, which is fine!
Remove any air bubbles from the tape. You can do this by pushing down over the taped surface with a credit card or any flat surface. The Dulepax tape is clear, so you won’t even be able to tell it’s there.
Repairing Pop-Up Camper Canvas Holes with Adhesive
Let’s now explain how to fix your torn pop-up camper canvas if you’re using an adhesive to patch up a small tear like Better Boat Store’s marine sealant.
Once again, take the canvas on both sides and pinch it. Glue one side of the hole or tear and stick to the other side. Hold it in place for a few moments so the adhesive can bond. Then release it.
The glue will look dry after a couple of minutes but will likely need hours more to cure. Read the manufacturer’s instructions.
Repairing Pop-Up Camper Canvas Holes by Sewing
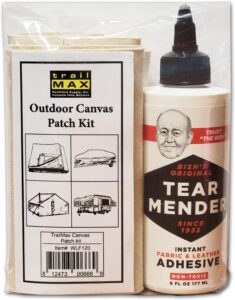
The last option you have is to buy a kit like the TrailMax outdoor canvas patch kit and sew a patch over the gaping hole or tear.
You must be choosy in the fabric patch you pick. It should be made of the same material as the rest of your camper canvas (fabric or vinyl) to ensure a color match.
This is less pressing if the fabric is black or white, of course, but will require your careful consideration if the fabric is a shade of blue, gray, or any other color.
What if you have a custom camper or one that’s heavily patterned? You will not be able to find a replacement no matter how high and low you search. Instead, contact your pop-up camper manufacturer.
Explain your issue to them and ask if they can send you a patch of fabric a little bigger than the size you need. You might have to pay for this fabric, or the manufacturer could send it to you for free.
Once you have the fabric, you can stitch it on or use an adhesive glue.
Step 7 – Reassemble the Awning
Your awning is back together again. Following the steps from earlier but backward, reassemble your awning, close it up, and hit the road in your camper.
Is It Hard to Fix Canvas on a Pop-Up Camper?
As the steps above illustrate, it’s not difficult to fix canvas on a pop-up camper. If your awning detaches from your vehicle, you’ll spend the most time removing it, unfurling it, and taking out the canvas, then putting everything back together again when you’re done.
If none of your fabric surfaces come off your camper, it’s easier and harder to fix holes. I say it’s easier because you can skip the above steps, but it’s harder because you might have to work on a ladder to reach some tears.
Tips for Maintaining Your Camper Canvas
You’ve repaired the camper canvas, and your pop-up lives to ride another day. The following tips will help you preserve the material for many seasons to come.
Inspect the Canvas Regularly
Begin incorporating regular inspections of your camper canvas into your maintenance routine. Ideally, check after every trip to see how the canvas fared and if it’s weaker in some areas than others.
Some signs that you could have to repair the fabric sooner than later are sun fading, thinness, and loose or frayed threads.
Take Shelter in Inclement Weather
Your safety is paramount in inclement weather, but it helps if you can protect your vehicle too. Try to pull down as many pop-up components as you can and get out of the direct line of fire during a storm.
Keep the Canvas Clean
Remember, small bits of debris like pebbles or caked-on dirt can rub at the canvas of your pop-up camper and eventually lead to holes. Wash the canvas at least once a month.
Limit Sun Exposure
The sun is one of your biggest enemies as a pop-up camper owner. Safeguard your vehicle from sunlight. Park in shady spots if you can, such as under the cover of a building or a tall, shady tree.
Fix Small Holes and Tears
I want to reiterate one more time that small tears in your camper canvas will quickly become bigger. Take care of them right away so they’re faster and easier to deal with.
Mold and Mildew
If you have issues with mold and mildew on your canvas, here’s a video on how I got rid it without damaging the canvas.
Conclusion
It’s not difficult to fix torn canvas on a pop-up camper, and the sooner you can tackle these repairs, the better. You’ll have more options at your disposal that don’t work for larger holes and tears. Good luck!